Thursday, October 27, 2011

SSDs and Windows 'Users' Directory

After getting my new SSD installed, I really wanted to get everything setup so that my data was safe on the 1 TB RAID 1 array.  This meant somehow moving the Users directory from C:\ (the SSD) to D:\ (the RAID).

The two main approaches are:

  1. Use an unattend.xml file during Windows installation to specify the Users directory.
  2. Move the Users directory after installation, and create a junction point at the original location to point to the newly located directory.  Here, the junction essentially acts as a symbolic link (although symlinks are a different thing in NTFS.)
After reading a ton of forum and blog posts, I decided to follow Marilyn O's advice on this question and decided to go with #2, because it is a single point of change, and should be easily reversible.

Here's how I got it working.  C: is my SSD where Windows is installed, and D: is the RAID array to which I'm moving my Users directory. Your drives/paths may be different.
  1. Install windows as usual.  Go a head and get the OS in a working state.

  2. Boot to a command line from the install media.  Follow these directions, but on the System Recovery Options dialog, click the last one, Command Prompt.

  3. Use robocopy to make an exact copy of Users to the new location:
    robocopy /mir /xj C:\Users D:\Users
    /mir makes an exact mirror, and /xj ignores junction points. Make sure to include these options!

  4. Verify that all the data has been successfully copied. Then, remove the original Users directory:
    rmdir /s /q C:\Users
    You really have to do this. See comment at the end for why.

  5. There is a junction named "Documents and Settings" (remember him from XP?) that currently points to C:\Users for compatibility purposes. We need to first remove him:
    rd "Documents and Settings"

  6. Now, make the new junctions pointing to the new Users folder on D: using mklink:
    mklink /j C:\Users D:\Users
    mklink /j "C:\Documents and Settings" D:\Users

    (Yes, Linux users, those arguments are in the opposite order.)

  7. Reboot and log in to Windows. If you look in C: in windows explorer, you should see that Users now has a shortcut overlay, indicating that it is a junction point:

Go ahead and play with it; files you make in C:\Users will be there in D:\Users.  Now granted, this may be a slight performance hit, because we have moved some important user files (ntuser.dat for example) onto the slower HDD.  In my opinion though, this is worth it, considering all of my user data is safe.  Additionally, I can back up the entire D: drive, and not worry about wasting space backing up Windows too.

Notes:

I originally just renamed C:\Users to old_users but this caused me to have another Users directory in C: when I looked in windows explorer!  And old_users was nowhere to be found.  But, everything looked okay from the command line.  I even copied it, and had the same results. So there must be some trickery going on that causes windows explorer to show it as Users. Deleting the directory made everything hunky-dory.

New PC!

I finally built a new computer.  My previous one was a Pentium D machine I built my sophomore year of college, in 2007.  I had seen evidence of bad capacitors over a year ago, but hadn't had any problems until recently. Since June, my system's stability had been getting worse as time went on.  More and more frequent blue screens were happening, and I was getting quite tired of it.  I knew that MACHINE_CHECK_EXCEPTION was not a good sign, and almost certainly pointed to a hardware issue.

So I did it.  Tired of my crappy VIA chipset, I made sure to go with an Intel system this time (not that there are really any other options these days, if you have an Intel CPU).

Motherboard Asus P8P67 LE   (Part of this Bundle)
CPU Intel Core i5-2500K
RAM 8 GB (2 x 4GB) Corsair DDR3 1600MHz
GPU XFX Radeon HD 5570 - 1GB DDR3
PSU Thermaltake TRX-650M 650-Watt Modular
Case Cooler Master Elite 310

You'll notice there are no hard drives on that list. I (somewhat recently) put two 1TB Hatachi HDs in RAID 1 so I decided to move those drives to the new box as well.

Overall, I am quite happy with the build. The case obviously isn't worth a million bucks, but it is sturdy and does the job.  The power supply is very nice for the price; I love the modular cords (I hate a messy case!) and it runs quiet and cool.  The one thing I'm not particularly thrilled about is that there are no mounting holes on the right side of the motherboard, so you have about 3" of overhanging PCB, right on the edge where the big connections (24 pin ATX!) are made.

This ASUS board has plenty of bells and whistles that you can read all about. Fancy graphical EFI BIOS, and EPU/TPU chips which are supposed to dynamically auto-tune the system for performance/energy.  I have TPU switched off right now, and will play with overclocking a little bit later (especially since my RAM is 1600MHz and the board defaults to 1333.)

After getting the system built, I got to thinking about SSDs. A quick look at the numbers was enough to sell me right away. Modern SSDs are pushing over 400MB/s and some claim read speeds of up to 500MB/s. At 3.9Gbps, I'm glad my board has several 6Gbps SATA ports!

So I went with the 128GB Crucial m4. It showed up today and I could not wait to get windows installed on it.  Let me just say WOW.  If you are for one second considering making the switch to an SSD, go for it.  I have yet to run any benchmarks on it vs my RAID array, but it is blazing fast.  Windows boots up noticeably much quicker, and everything is just very snappy.  (And yes this is compared to a HDD install on this board/CPU I did before the SSD arrived).

Wednesday, September 21, 2011

A real Python parse integer function

Is anyone else annoyed by the fact that int() in python is retarded and can't tell the difference between decimal, hex, and octal?

Your solution:

def parseint(val):
    if isinstance(val, int):
        return val
    if not isinstance(val, (unicode,str)):
        return None


    try:
        if val.startswith('0x'):
            return int(val, 16)
        if val.startswith('0'):
            return int(val, 8)
        return int(val)
    except ValueError:
        return None

Hope this helps someone.

Monday, August 29, 2011

phpRandDotOrg client updated to 1.0.3

Just a quick note, that my random.org PHP client library has been updated to version 1.0.3, thanks to bugfixes reported to me recently.

Monday, August 22, 2011

Time-Warner RoadRunner speeds

Overall, I'm pleased with the internet service I get from RoadRunner.  My connection can definitely top out well over the 15Mbps it's rated at:


I could stand a little faster than 1.0Mbps upload, but that's pretty typical, as normal residential connections see very asynchronous traffic (download usage much higher than upload).

However, today I came home to find that my router had no WAN IP, and I was unable to view the modem status page at 192.168.100.1 (give that a click if you have a Scientific Atlanta cable modem), so I power-cycled the modem.  Now usually, when I access that address, the only page I can view is the Status page.  All other ones are locked, and say "this feature is not enabled" - because we as users are "dumb" and don't "want" to see that information.  But - they are available while the modem's connection is not Locked, meaning if the cable is unplugged or the modem is still connecting.

I managed to snag a screenshot right before it locked me out again:

Truly amazing how fast the actual connection is.  And truly saddening to know how much throttling is being done on their end.  C'mon TW - would it really kill you to let me have 2 or 3 of that 30MBps upload?

Update to root on HTC Incredible

So I've been enjoying my rooted Incredible for a little over a week now. After my last post, I decided to install the CyanogenMod 7.0.3 ROM.  First let me say, "wow" at just how simple it was to download the .zip file, transfer it via USB (mass storage) to my flash card, and use ClockworkMod Recovery to install the new ROM (after backing up of course!!)  Take that link with a grain of salt, as UnrEVOed3 installs it by default now.

I had installed ClockworkMod ROM Manager (free) from the Market, but decided I wanted to do this first one from the recovery image.  The ROM Manager uses the recovery image anyway, so it shouldn't really matter how I do the next one.  On to the results!

Holy. Battery. Life.
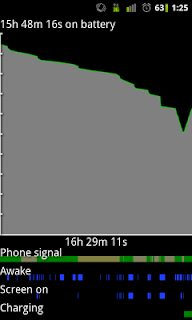
Battery usage screenshot
Not only is the (built-in) battery usage screen awesome, (and the ability to screenshot), but that is 16 hours with a discharge of a little less than 50 percent! Granted, this was over a work day, so it wasn't seeing a ton of usage, but you can see that the phone was waking up and syncing.  This is possibly twice as good as I was seeing with the stock HTC Sense ROM.

I can't show this in a screenshot, but the overall response of the phone is like night and day compared to Sense (in my opinion).  Screens and menus load almost instantly. Apps load many times faster, and it feels like a real 1GHz device!  Granted, this is a fresh install, so I haven't gotten it bogged down, but it is definitely faster than Sense ever was.

I strongly recommend that if you have an Android phone, that you root it, or give it to someone to do it for you.  You won't be disappointed.

Sunday, August 14, 2011

root on HTC Incredible

So I decided today that it was finally time to root my HTC Incredible.  And as I was told by several friends, it was pretty much a piece in the cake.  Anyone wishing to do so, I recommend following this walk-through by Jonathan Eggers.

The basic run-down:
- Install the Android SDK - you really just need this for adb, the Android Debug Bridge. This provides you with an interactive shell, as well as the ability to push / pull files, and install .apk packages.  If you download the .zip instead of the .exe, you don't have to worry about installing the JDK.

- Run unrevoked3 to perform the root process, as well as install the ClockworkMod Recovery, which allows you to do some cool things pre-OS boot.

-Use clockworkmod to make a full NAND backup.

- Install Titanium Backup to make/restore backups while booted into the UI. Also allows you to uninstall a bunch of the junk Verizon forces you into having (Skype mobile, VZ navigator, etc)

- Install WiFi Tether.


I also installed a new boot splash-screen because I was tired of the stock one. For 2.2, you need to rename the bootanmiation.zip inside that zip file to VZW_bootanimation.zip and send it down. You can also replace the VZW_Droid.mp3 with a sound of your choice.

Finally (for now!) I installed QuickSSHd by TeslaCoil Software. It's pretty much just dropbear with a nice UI, but it was everything I was looking for and only $1.75 in the Market.  If you already have shared keys set up for other SSH servers, you can simply copy your public key to ~/.ssh/authorized_keys, just like OpenSSH (the same format works).

Next up is to check out some of the top root apps on androidsu.com

Looking forward to playing with some kernels and ROMs in the future, but for now I am quite happy!

Monday, August 1, 2011

Windows 7 won't boot!

Well in a nutshell, here's how this problem unfolded, and came to be corrected.

New Install
I bought a pair of 1TB drives, and set them up in a RAID 1 array, using the VT8237A southbridge's built-in RAID feature. I left my old 200GB PATA drive in-place, so I could copy my files to the array. Then, I installed Windows 7 on the array, and everything was great. Until I happened to notice (while cleaning up) a new file: bootmgr on the old drive. A quick Google search told me that this was the Vista/7 bootloader. Crap! The brilliant installer decided to put the Win7 install on the new RAID array, where I specified, but put the bootloader on the old drive!

Steps:
- Unhook old drive, which renders system unbootable.
- Boot up Win 7 setup DVD, and select Repair (not install).
- Choose command prompt.

From Command prompt:
- diskpart
- list disk
- select disk 0
- list partition
- select partition 1
- active
- exit
(This marks the partition as active, which it was not before.  This is required for the BIOS to see it as bootable.)

Next, need to fix boot sector:
- bootrec /FixMbr
- bootrec /FixBoot
- bootrec /RebuildBcd

Then, close command prompt, and choose startup repair.  It may take once through for it to say fixed an error, then reboot. Then go back to startup repair. Here you should be able to run the automatic startup repair, and it will tell you that BOOTMGR was missing, which it will correct.

It now works for me, without the old drive!!!

Tuesday, July 12, 2011

MySQL Service won't start on Windows 7

So today, I attempted to install MySQL on Windows 7.  From the MySQL Download site, I grabbed the latest version of their .msi installer,  mysql-installer-5.5.13.2.msi.  I went through the installer, and found that the last step, starting the MySQL services (mysqld) was failing.  The service existed in services.msc, and in the registry, but it refused to start.  Attempting to start it from the command line ("NET START MySQL") failed, giving the following output:

The MySQL service is starting...
The MySQL service could not be started.

A system error has occurred.

System error 1067 has occurred.

The process terminated unexpectedly.

Very descriptive. Thanks.  I tried checking for a log file from MySQL, but could't find it. Strange.  Well, it turns out, MySQL on windows has its data directory at C:\ProgramData\MySQL\MySQL Server 5.5\data.   You can verify this in your installation by looking at the my.ini file, in your MySQL installation directory (probably C:\Program Files (x86)\MySQL\MySQL Server 5.5\), and finding the line that says datadir=...

I didn't even know ProgramData existed!  It's hidden, so either unhide it (Control Panel -> Folder Options -> Show hidden...) or simply enter c:\ProgramData into your explorer title bar.  In this data directory, there should exist the log file [hostname].err.  Taking a glance at that, I found:

InnoDB: Error: log file .\ib_logfile0 is of different size 0 33554432 bytes
InnoDB: than specified in the .cnf file 0 56623104 bytes!

Thanks to this post on forums.mysql.com, I found that simply deleting ib_logfile0 and ib_logfile1 solved the problem.  Seems like a dumb installer mistake to me!  A bug report already exists, so I'll just keep quiet until the next install :-)  Hope this helps!

Tuesday, June 21, 2011

Windows 7 "Unidentified Network" woes

There are hundreds of posts in forums and in blogs with people complaining about not being able to click the "Public Network" link and change an "Unidentified Network" to the Private profile:


In this case, it was my VirtualBox Host-Only connection, but this could really apply to any private network with static IP addresses and no DHCP server (and usually no Default Gateway - I think this is what makes Windows decide it is "unidentified").

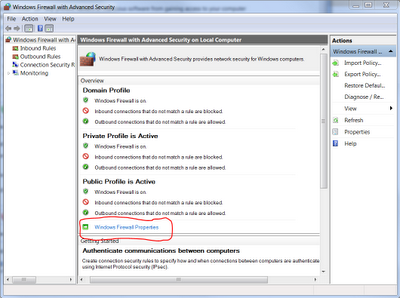
In my situation, I was unable to ping the windows host from my VM, and subsequently couldn't access any Samba shares on my host.  After hours of digging, I gave up on trying to "identify" this network, and instead went after the windows firewall settings.  Since windows insists on making this a public network, I chose to disregard windows firewall, for this interface only:


After this, I was able to ping the windows host, and view its Samba shares.  Hope this helps.

Thursday, February 24, 2011

(x % 2), What's all this and-ing and or-ing?

While trying to understand some x86 disassembly, I came across one particularly confusing bit of code (modified for this example):

mov   eax, edx
  L0:
     and   eax, -2147483647        ; 80000001H
  L1:
     jns   SHORT L4
     dec   eax
  L2:
     or    eax, -2                 ; fffffffeH
  L3:
     inc   eax
  L4:
     mov   DWORD PTR _r$[ebp], eax

I couldn't intuitively look at this one and understand what it meant. I could tell that it was primarily looking at only the highest (sign) and the lowest bits. I ended up putting together a table, showing eax at each line (ie. after the result of the previous line)

L0      L1       L2        L3       L4       result
----------------------------------------------------
-ODD    10..01   10..00    11..10   11..11    -1
-EVEN   10..00   01..11    11..11   00..00     0
+ODD    00..01                      00..01     1
+EVEN   00..00                      00..00     0

Oh, now it's painfully obvious; it's just a modulo-2 (%2) operation. But why was that so complicated? After some searching, it appears that one could just use IDIV (Signed Divide) instruction, which places the quotient in (E)AX and the remainder in (E)DX. One instruction, and there's your result, what was so hard about that?

Turns out that IDIV is really slow. IDIV on a Pentium processor takes a whopping 46 clock cycles! Let's compare that to the worst case of this other funky algorithm:
and (r,i)   = 1
   jns (short) = 1  (4 if mispredicted)
   dec (r)     = 1
   or  (r,i)   = 1
   inc (r)     = 1
Wow, only 5 clock cycles, (8 if the jns was mispredicted). No wonder they go through all that hassle!


So next time you see this bizarre x86 assembly, hopefully you can identify it as just a %2 !

References: