It happens sometimes: You'd like to rename your SVN repository. Well simply renaming the directory on the server won't do the trick.
Thanks to Miky Dinescu's post, we find that the best way to do this is use svnadmin dump and svnadmin load to export, and import the old repository into a new one, without losing anything.
I wrapped this process up in a nice, foolproof script. Hopefully it makes your life easier.
Wednesday, November 14, 2012

Saturday, June 9, 2012
Cyanogenmod 9 Nightly!
I am happy to say that I am running Cyanogenmod 9 (nightly, dated 20120608) on my Galaxy Nexus!

I am very happy with it, and have noticed no problems, which is pretty impressive because this is a nightly build, not even a Beta / RC. The CM9 team has done a fantastic job with this version, and stuck very close to the original ICS look and feel.
Things I am happy about:

I am very happy with it, and have noticed no problems, which is pretty impressive because this is a nightly build, not even a Beta / RC. The CM9 team has done a fantastic job with this version, and stuck very close to the original ICS look and feel.
Things I am happy about:
- The settings menu. The stock build just seems so crippled to me now, after seeing the CM9 settings. It is too expansive to screenshot, but still quite organized. You can tweak everything from display gamma settings, to the lock screen, to individual volumes, to kernel performance, to (my favorite!) the notification LED.
Coming from the Incredible, which just had the orange and green notification LED, having an RGB LED that I can play with is great. I have a green blink for texts, slow red for Gmail, and fast light blue for missed calls. - The notification drawer. (I couldn't get a screenshot, because the drawer retracts before it is taken.) I really missed these widgets, and now have quick access buttons to toggle Wi-Fi, LTE (So happy about this one!), GPS, Silent/Vibrate/Loud, and Auto-Rotate. There are other buttons you can add, but these are the ones I wanted. Also, I tweaked the battery icon.
- Customizable navigation buttons. I re-ordered the buttons at the bottom (to more closely match my Incredible, actually) and added the search button, which behaves the same way.
- All of the familar 'root stuff' built right in. Superuser (of course), Wi-fi tethering, screenshot, etc.
Over I am quite pleased, and will probably keep using this on a day-to-day basis. This is the way Android was meant to be. Can't wait for an RC!
Additional note: Of course, this comes without the Google Apps, so you'll want to download that zip from goo.im/gapps.
Additional note: Of course, this comes without the Google Apps, so you'll want to download that zip from goo.im/gapps.
Monday, June 4, 2012
Android 4.0.4 OTA update
A couple days ago, I started getting notifications that a system update was ready for install. This was the IMM76K (Android 4.0.4) OTA update that people had been impatiently waiting on for a while. After making a nandroid backup (via CWM), I decided to give it a try.
The system rebooted, and went to the screen with the android's belly open and the blue spinny thing. Then he was on his back, with the dreaded red triangle. I wasn't surprised that the OTA update wasn't going to work with my modified phone.
This excellent post on xda-developers gave links to the official OTA updates for the different versions of the G-Nex. So I downloaded the mysid IMM76K from ICL53F update.zip, and adb push'd it to /sdcard. Rebooting into CWM recovery, I tried to install the update, but it failed with:
I knew why it was failing. I had removed some of the VZW garbage apps that cam pre-installed. Luckily, I didn't actually delete them, I had just renamed them to .apk.REMOVED. After putting them back1 the update installed successfully.
Another thing to note - I didn't realize it, but the xda post pointed out this important detail: Verizon OTA updates include a script that runs every boot, whose purpose is to restore the recovery image if it is not the expected stock image. The script is at /system/etc/install-recovery.sh and the recovery image (for flashing) is /system/recovery-from-boot.p. Thus, if you don't wan't to lose CWM (or other custom recovery), you need to rename these files.
Notes:
1 - I didn't realize it, but ADB is supported in CWM. When I looked in device manager while my phone was connected and in CWM, I saw one device just named "Full". I manually specified the same Samsung drivers (already installed) from before, and bingo, my phone showed up in adb devices.
The system rebooted, and went to the screen with the android's belly open and the blue spinny thing. Then he was on his back, with the dreaded red triangle. I wasn't surprised that the OTA update wasn't going to work with my modified phone.
This excellent post on xda-developers gave links to the official OTA updates for the different versions of the G-Nex. So I downloaded the mysid IMM76K from ICL53F update.zip, and adb push'd it to /sdcard. Rebooting into CWM recovery, I tried to install the update, but it failed with:
assert failed: apply_patch_check("/system/app/VZWBackupAssistant.apk".....
I knew why it was failing. I had removed some of the VZW garbage apps that cam pre-installed. Luckily, I didn't actually delete them, I had just renamed them to .apk.REMOVED. After putting them back1 the update installed successfully.
Another thing to note - I didn't realize it, but the xda post pointed out this important detail: Verizon OTA updates include a script that runs every boot, whose purpose is to restore the recovery image if it is not the expected stock image. The script is at /system/etc/install-recovery.sh and the recovery image (for flashing) is /system/recovery-from-boot.p. Thus, if you don't wan't to lose CWM (or other custom recovery), you need to rename these files.
Notes:
1 - I didn't realize it, but ADB is supported in CWM. When I looked in device manager while my phone was connected and in CWM, I saw one device just named "Full". I manually specified the same Samsung drivers (already installed) from before, and bingo, my phone showed up in adb devices.
Saturday, May 12, 2012
Galaxy Nexus (CDMA)
Well after several months of putting up with my rebooting (sometimes looping) when I used any substantial amount of 3G data, I decided to upgrade. I was looking at the HTC Rezound and the Samsung Galaxy Nexus, and found this really good comparison article on phoneArena. Ultimately, after many recommendations by friends, I went with the Nexus.
It arrived, running Android 4.0.2. This time, I lasted about 2 days before rooting it. Everybody has their own half-assed write ups of this, but I wanted to mainly include my sources for some of these files:
ADB / Fastboot Drivers
I downloaded the USB drivers directly from Samsung's site on their SCH-I515 download page. It's a 23MB download which is a bit ridiculous, but I wan unable to isolate exactly which driver was required from the compressed exe.
After installing them, I was able to plug in my phone, turn on USB debugging, execute "adb devices" and see my device. Next, I rebooted into fastboot mode (hold all three buttons to turn it on). At this point, the device showed up as "Android 1.0". However, I was able to fix that by:


Then, there should be just one "SAMSUNG Android ADB Interface" listed.
After correcting the driver issue, I was able to execute "fastboot devices" and see my device.
Unlock Bootloader
Next step is "fastboot oem unlock" !

After unlocking, I rebooted, and the Google screen now has an unlocked icon!

ClockworkMod Recovery
After making sure the phone booted OK, I flashed the latest (touch) version of CWM from the ClockworkMod ROM Manager page. At this time, that version was recovery-clockwork-touch-5.8.0.2-toro.img. Simply download and "fastboot flash recovery recovery-clockwork-touch-5.8.0.2-toro.img".
ROOT
Next, I rebooted, and went through the initial setup. Now it's time to actually get root! The page that I had been following included some version of SuperSU. I didn't really want to just use what they gave me, and went on the hunt for the latest su.
Note for root newbies: "Root" essentially means having access to the su ("superuser") binary, which allows a process to run as the root user. On android, "root" is two components: The su binary (linux executable), and Superuser.apk, which is the accompanying Android app, which manages requests for root, logs, etc.
It appears that androidsu.com is the true "home" of superuser for Android. So I downloaded the latest, Superuser-3.0.7-efghi-signed.zip, and used "adb push ....zip /sdcard/" to push it to my phone.
Then I rebooted into recovery again ("adb reboot recovery"), and tried to install it, with the “Install zip from sdcard” option. However, I got the following: “E:Error in /sdcard/Superuser-3.0.7-efghi-signed.zip (Status 0)". Doing a little research, I found the following posts:
Resources
http://galaxynexusroot.com/galaxy-nexus-root/how-to-root-galaxy-nexus-universal-guidegsmverizonsprintwindowslinuxmac/
It arrived, running Android 4.0.2. This time, I lasted about 2 days before rooting it. Everybody has their own half-assed write ups of this, but I wanted to mainly include my sources for some of these files:
- ADB / Fastboot Drivers - Samsung SCH-I515 download page
- ClockworkMod Recovery - ClockworkMod ROM Manager page - recovery-clockwork-touch-5.8.0.2-toro.img
- Superuser - http://download.clockworkmod.com/test/su.zip
ADB / Fastboot Drivers
I downloaded the USB drivers directly from Samsung's site on their SCH-I515 download page. It's a 23MB download which is a bit ridiculous, but I wan unable to isolate exactly which driver was required from the compressed exe.
After installing them, I was able to plug in my phone, turn on USB debugging, execute "adb devices" and see my device. Next, I rebooted into fastboot mode (hold all three buttons to turn it on). At this point, the device showed up as "Android 1.0". However, I was able to fix that by:
Then, there should be just one "SAMSUNG Android ADB Interface" listed.
After correcting the driver issue, I was able to execute "fastboot devices" and see my device.
Unlock Bootloader
Next step is "fastboot oem unlock" !

After unlocking, I rebooted, and the Google screen now has an unlocked icon!

ClockworkMod Recovery
After making sure the phone booted OK, I flashed the latest (touch) version of CWM from the ClockworkMod ROM Manager page. At this time, that version was recovery-clockwork-touch-5.8.0.2-toro.img. Simply download and "fastboot flash recovery recovery-clockwork-touch-5.8.0.2-toro.img".
ROOT
Next, I rebooted, and went through the initial setup. Now it's time to actually get root! The page that I had been following included some version of SuperSU. I didn't really want to just use what they gave me, and went on the hunt for the latest su.
Note for root newbies: "Root" essentially means having access to the su ("superuser") binary, which allows a process to run as the root user. On android, "root" is two components: The su binary (linux executable), and Superuser.apk, which is the accompanying Android app, which manages requests for root, logs, etc.
It appears that androidsu.com is the true "home" of superuser for Android. So I downloaded the latest, Superuser-3.0.7-efghi-signed.zip, and used "adb push ....zip /sdcard/" to push it to my phone.
Then I rebooted into recovery again ("adb reboot recovery"), and tried to install it, with the “Install zip from sdcard” option. However, I got the following: “E:Error in /sdcard/Superuser-3.0.7-efghi-signed.zip (Status 0)". Doing a little research, I found the following posts:
- http://androidsu.com/superuser/#comment-6120
- http://www.theandroidsoul.com/root-ice-cream-sandwich-on-att-galaxy-s2-skyrocket/#comment-478881789
I tried everything, but could not get it to install. Instead, I found myself on download.clockworkmod.com. In /su/, I found seven different "-test" versions, and in /test/ there is one su.zip. (I can't for the life of me find the site that linked to that one.) It turns out that that is the one that worked for me. I don't quite understand, but whatever, it successfully installed via CWM. After rebooting, Superuser was installed, and showed the correct version of the binary (and updated it too!).
What's Next
Next, I'm probably going to upgrade to the stock Android 4.0.4 ROM, as it supposedly makes some big improvements. That page links to this thread. Also in my sights for a new ROM are this IMM76K 4.0.4 mod, and of course CyanogenMod 9, which is currently available only in nightlies.
Resources
http://galaxynexusroot.com/galaxy-nexus-root/how-to-root-galaxy-nexus-universal-guidegsmverizonsprintwindowslinuxmac/
Sunday, April 29, 2012
Never knew Downloader.Agent2.BBLD was so simple
I had just started writing a new C++ console app (under Visual Studio 2010 10.0.40219.1 SP1Rel) to test something out, and had just this:
I unintentionally clicked Start Debugging, and much to my surprise,

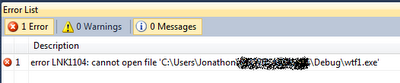
Really? How did I screw up something so simple? Several seconds later AVG popped up this "Resident Shield Alert":
int main(int argc, char** argv)
{
printf("WTF is going on\n");
return 0;
}
Again, threat detected! This time Downloader.Agent2.BAZE. I disabled AVG, built it again (successfully!) and threw the EXE into IDA, worried that I had some impressive virus injecting a trojan into EXEs I build. Nothing out of the ordinary found, just the typical complicated CRT startup code, and my simple main().
I uploaded it to VirusTotal to see if this was just AVG being retarded or what. It had a detection ratio of 8 / 42. Check out that link to see each AV and what they detected it as. It is important to note that AVG picked up the file before it had even finished building (hence the link error) with Resident Shield, but also the finished EXE with a manual scan.
"This is absurd!" I'm thinking. One more try....
int main(int argc, char** argv)
{
printf("WTF is going on\n");
getchar();
printf("This is ridiculous\n");
return 0;
}
Finally, this one built okay and AVG let it alone. Curious, I uploaded this one to VirusTotal too. It was picked up by only 1 / 42 AVs: McAfee-GW-Edition identified it as Heuristic.BehavesLike.Win32.Suspicious.H. Sounds more like Heuristic.WeHaveNoIdea.FlagEverything.H
#include <stdio.h>
#include <Windows.h>
int main(int argc, char** argv)
{
return 0;
}
I unintentionally clicked Start Debugging, and much to my surprise,

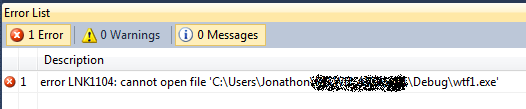
Really? How did I screw up something so simple? Several seconds later AVG popped up this "Resident Shield Alert":
 |
| Downloader.Agent2.BBLD |
Are you kidding me? So I added a printf...
{
printf("WTF is going on\n");
return 0;
}
Again, threat detected! This time Downloader.Agent2.BAZE. I disabled AVG, built it again (successfully!) and threw the EXE into IDA, worried that I had some impressive virus injecting a trojan into EXEs I build. Nothing out of the ordinary found, just the typical complicated CRT startup code, and my simple main().
I uploaded it to VirusTotal to see if this was just AVG being retarded or what. It had a detection ratio of 8 / 42. Check out that link to see each AV and what they detected it as. It is important to note that AVG picked up the file before it had even finished building (hence the link error) with Resident Shield, but also the finished EXE with a manual scan.
"This is absurd!" I'm thinking. One more try....
int main(int argc, char** argv)
{
printf("WTF is going on\n");
getchar();
printf("This is ridiculous\n");
return 0;
}
Finally, this one built okay and AVG let it alone. Curious, I uploaded this one to VirusTotal too. It was picked up by only 1 / 42 AVs: McAfee-GW-Edition identified it as Heuristic.BehavesLike.Win32.Suspicious.H. Sounds more like Heuristic.WeHaveNoIdea.FlagEverything.H
Thursday, October 27, 2011
SSDs and Windows 'Users' Directory
After getting my new SSD installed, I really wanted to get everything setup so that my data was safe on the 1 TB RAID 1 array. This meant somehow moving the Users directory from C:\ (the SSD) to D:\ (the RAID).
The two main approaches are:

I originally just renamed C:\Users to old_users but this caused me to have another Users directory in C: when I looked in windows explorer! And old_users was nowhere to be found. But, everything looked okay from the command line. I even copied it, and had the same results. So there must be some trickery going on that causes windows explorer to show it as Users. Deleting the directory made everything hunky-dory.
The two main approaches are:
- Use an unattend.xml file during Windows installation to specify the Users directory.
- Move the Users directory after installation, and create a junction point at the original location to point to the newly located directory. Here, the junction essentially acts as a symbolic link (although symlinks are a different thing in NTFS.)
After reading a ton of forum and blog posts, I decided to follow Marilyn O's advice on this question and decided to go with #2, because it is a single point of change, and should be easily reversible.
Here's how I got it working. C: is my SSD where Windows is installed, and D: is the RAID array to which I'm moving my Users directory. Your drives/paths may be different.
- Install windows as usual. Go a head and get the OS in a working state.
- Boot to a command line from the install media. Follow these directions, but on the System Recovery Options dialog, click the last one, Command Prompt.
- Use robocopy to make an exact copy of Users to the new location:
robocopy /mir /xj C:\Users D:\Users
/mir makes an exact mirror, and /xj ignores junction points. Make sure to include these options!
- Verify that all the data has been successfully copied. Then, remove the original Users directory:
rmdir /s /q C:\Users
You really have to do this. See comment at the end for why.
- There is a junction named "Documents and Settings" (remember him from XP?) that currently points to C:\Users for compatibility purposes. We need to first remove him:
rd "Documents and Settings"
- Now, make the new junctions pointing to the new Users folder on D: using mklink:
mklink /j C:\Users D:\Users
mklink /j "C:\Documents and Settings" D:\Users
(Yes, Linux users, those arguments are in the opposite order.)
- Reboot and log in to Windows. If you look in C: in windows explorer, you should see that Users now has a shortcut overlay, indicating that it is a junction point:

Go ahead and play with it; files you make in C:\Users will be there in D:\Users. Now granted, this may be a slight performance hit, because we have moved some important user files (ntuser.dat for example) onto the slower HDD. In my opinion though, this is worth it, considering all of my user data is safe. Additionally, I can back up the entire D: drive, and not worry about wasting space backing up Windows too.
Notes:
I originally just renamed C:\Users to old_users but this caused me to have another Users directory in C: when I looked in windows explorer! And old_users was nowhere to be found. But, everything looked okay from the command line. I even copied it, and had the same results. So there must be some trickery going on that causes windows explorer to show it as Users. Deleting the directory made everything hunky-dory.
New PC!
I finally built a new computer. My previous one was a Pentium D machine I built my sophomore year of college, in 2007. I had seen evidence of bad capacitors over a year ago, but hadn't had any problems until recently. Since June, my system's stability had been getting worse as time went on. More and more frequent blue screens were happening, and I was getting quite tired of it. I knew that MACHINE_CHECK_EXCEPTION was not a good sign, and almost certainly pointed to a hardware issue.
So I did it. Tired of my crappy VIA chipset, I made sure to go with an Intel system this time (not that there are really any other options these days, if you have an Intel CPU).
You'll notice there are no hard drives on that list. I (somewhat recently) put two 1TB Hatachi HDs in RAID 1 so I decided to move those drives to the new box as well.
Overall, I am quite happy with the build. The case obviously isn't worth a million bucks, but it is sturdy and does the job. The power supply is very nice for the price; I love the modular cords (I hate a messy case!) and it runs quiet and cool. The one thing I'm not particularly thrilled about is that there are no mounting holes on the right side of the motherboard, so you have about 3" of overhanging PCB, right on the edge where the big connections (24 pin ATX!) are made.
This ASUS board has plenty of bells and whistles that you can read all about. Fancy graphical EFI BIOS, and EPU/TPU chips which are supposed to dynamically auto-tune the system for performance/energy. I have TPU switched off right now, and will play with overclocking a little bit later (especially since my RAM is 1600MHz and the board defaults to 1333.)
After getting the system built, I got to thinking about SSDs. A quick look at the numbers was enough to sell me right away. Modern SSDs are pushing over 400MB/s and some claim read speeds of up to 500MB/s. At 3.9Gbps, I'm glad my board has several 6Gbps SATA ports!
So I went with the 128GB Crucial m4. It showed up today and I could not wait to get windows installed on it. Let me just say WOW. If you are for one second considering making the switch to an SSD, go for it. I have yet to run any benchmarks on it vs my RAID array, but it is blazing fast. Windows boots up noticeably much quicker, and everything is just very snappy. (And yes this is compared to a HDD install on this board/CPU I did before the SSD arrived).
So I did it. Tired of my crappy VIA chipset, I made sure to go with an Intel system this time (not that there are really any other options these days, if you have an Intel CPU).
| Motherboard | Asus P8P67 LE (Part of this Bundle) |
| CPU | Intel Core i5-2500K |
| RAM | 8 GB (2 x 4GB) Corsair DDR3 1600MHz |
| GPU | XFX Radeon HD 5570 - 1GB DDR3 |
| PSU | Thermaltake TRX-650M 650-Watt Modular |
| Case | Cooler Master Elite 310 |
You'll notice there are no hard drives on that list. I (somewhat recently) put two 1TB Hatachi HDs in RAID 1 so I decided to move those drives to the new box as well.
Overall, I am quite happy with the build. The case obviously isn't worth a million bucks, but it is sturdy and does the job. The power supply is very nice for the price; I love the modular cords (I hate a messy case!) and it runs quiet and cool. The one thing I'm not particularly thrilled about is that there are no mounting holes on the right side of the motherboard, so you have about 3" of overhanging PCB, right on the edge where the big connections (24 pin ATX!) are made.
This ASUS board has plenty of bells and whistles that you can read all about. Fancy graphical EFI BIOS, and EPU/TPU chips which are supposed to dynamically auto-tune the system for performance/energy. I have TPU switched off right now, and will play with overclocking a little bit later (especially since my RAM is 1600MHz and the board defaults to 1333.)
After getting the system built, I got to thinking about SSDs. A quick look at the numbers was enough to sell me right away. Modern SSDs are pushing over 400MB/s and some claim read speeds of up to 500MB/s. At 3.9Gbps, I'm glad my board has several 6Gbps SATA ports!
So I went with the 128GB Crucial m4. It showed up today and I could not wait to get windows installed on it. Let me just say WOW. If you are for one second considering making the switch to an SSD, go for it. I have yet to run any benchmarks on it vs my RAID array, but it is blazing fast. Windows boots up noticeably much quicker, and everything is just very snappy. (And yes this is compared to a HDD install on this board/CPU I did before the SSD arrived).
Subscribe to:
Posts (Atom)